Photoshop works with image created from pixels. This means that the images are not infinitely scalable and pixelation can occur when they are increased in size. A number of things relate to the idea of size in a photoshop document such as resolution measured in ppi. 72 ppi is the standard for digital display and 300 ppi is the standard for print, this is because this is the ideal resolution for something held 10 to 12 inches away from the face this is because it creates a blend between the dots of colour.
When the distance something is going to be viewed from increases it is possible to get away with much lower resolution because the pixels are less distinguishable from greater distances. the more pixels there are in a given space the more accurately represented the image can be.
Resolution should always be considered when designing because it would be useless to design a website with 300 ppi if peoples computer screens would only be able to show 72 ppi. When paying for a website you actually rent out the space for each pixel son not only would the high resolution be useless it would be more expensive.
When considering photoshop the user can create directly into the program or import the information via a photograph or scan. When in photo shop in order to access the image size or resolution information you can go to image and image size in the top menu or hold down ctrl and click the document name at the bottom of the image.

Often with modern digital images the imported image maintains a relatively low 72 ppi yet increases its size accordingly. So the pixel size is still enormous. By increasing the resolution of an image the size of each pixel is reduced therefore reducing the physical dimensions of the image.
By choosing 'resample image' when the size of the image is reduced below that of the original captured image the ppi is automatically reduced accordingly. The quality of the image will not be reduced because the ppi is proportional to the original image.
If the resolution is manually altered this meant that the size of each pixel is altered. for example, if you were to half the resolution the pixels would double in size and change colour accordingly (the blended colour of all the pixels that previously made up that area.
When creating a new document the default setting for the print options is RGB rather than CMYK. This is because not only will the document be presented on screen and therefore in RGM but also because the coding of the program is done digitally some colours and effects are unavailable when working in CMYK. The best way to get around this is to work in RGB and convert the file before printing.
When looking for different colour modes look in the drop down menu under image and mode.

A diagram explaining the difference between the CMYK and RGB colour modes.
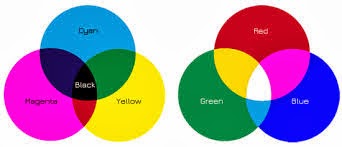
Colour Gamuts define the fact that the range of colours that can be produced by CMYK is a lot smaller than RGB.

The general idea being that light can produce a greater range of colours than ink. (it's going directly to the source of colour if you think about it, ink is merely a medium through which light is manipulated.)

When selecting a colour a small warming triangle may come up next to the swatch, this shows that this colour cannot be printed (is outside the CMYK colour range) to create the nearest colour that is printable simply click the swatch below this sign. The RGB colour range can be altered manually as can be seen above, the values start at 0 as black (a complete lack of light) and runs all the way through to 255 on all shades which is white. The number at the bottom of the window is a hex code which is a computer code for the creation of the colour in a web safe mode. The cube symbol next to the swatch comes up when the colour selected is not web safe (there is not a designated code) simply click the colour square below this symbol to move to the nearest web safe colour.
To change an RGB document to a CMYK to print you can simply send it to the printer and let that deal with it or change it through the image and mode options, however the colours are especially green.
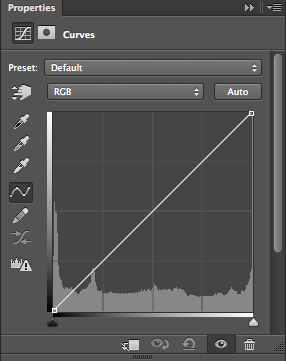
By adding an anchor point within this line we can alter the depth of the blacks and the purity of the whites adding texture and depth to a photograph. You can have multiple points on the line to really fine tune the specific colourings. The adjustment symbols of the right hand side of the screen hue saturation, colour balance
No comments:
Post a Comment